はじめましてはじめまして。
IT技術職やってる傍らブログなど今まで書いてなかったのですが、
なんのきっかけか、やらせていただくことになりました。
今日はSpring Boot(2.0.0.RELEASE)で Doma2(2.19.2)を利用するというお話です。
Doma2、2waySQLをかけるから色々便利だとおもってます。
下準備
SPRING INITIALIZRで、以下の様なプロジェクトをダウンロードしておき、
IDEにインポートします。
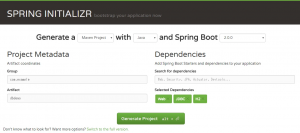
https://start.spring.io/
Pom.xmlの修正
doma関連の以下のdependencyを追加します。
<dependency>
<groupId>org.seasar.doma.boot</groupId>
<artifactId>doma-spring-boot-starter</artifactId>
<version>1.1.1</version>
</dependency>
<dependency>
<groupId>org.seasar.doma</groupId>
<artifactId>doma</artifactId>
<version>2.19.2</version>
</dependency>
追加後、プロジェクトを右クリックし、mavenをUpdateします。
プロジェクトのコンパイラの設定
SQLファイルを認識できる様にするため、以下の設定を行います。
※以下はEclipseでの設定になります。
①JavaBuildPathのSourceタブを開き、xxxx/src/main/resourcesのExcludedを*.*からNoneにします。
②JavaCompiler → Annotation Processing をEnabledにします。
③Factory PathをEnabledにし、doma-2.19.2.jarをアノテーションプロセッサに指定します。
エンティティクラスの作成
Entityクラスは、(今回は)DB検索データの受け皿となるクラスです。
フィールドの修飾子はpublicにしておきます。
package com.example.dbdemo.domain.model;

import org.seasar.doma.Entity;
import org.seasar.doma.GeneratedValue;
import org.seasar.doma.GenerationType;
import org.seasar.doma.Id;

@Entity
public class Users {
    @Id
    @GeneratedValue(strategy = GenerationType.IDENTITY)
    public Integer id;
    public String name;
}
DAOインタフェースの作成
@ConfigAutowireableはDomaの@AnnotateWithを使って、生成されるDAO実装クラスに@Repositoryと@Autowiredを付与するためのアノテーションとのことです。
RepositoryクラスはSpring側から見た、「データソースへのやり取りを記述するクラス」を指します。アノテーション「@Repository」の指定により、指定されたクラスはRepositoryクラスとなります。
package com.example.dbdemo.domain.repository;

import java.util.List;

import org.seasar.doma.Dao;
import org.seasar.doma.Insert;
import org.seasar.doma.Select;
import org.seasar.doma.boot.ConfigAutowireable;
import org.springframework.transaction.annotation.Transactional;

import com.example.dbdemo.domain.model.Users;

@ConfigAutowireable
@Dao
public interface UsersRepository {
    @Select
    List selectAll();

    @Insert
    @Transactional
    int insert(Users reservation);
}
Configクラスの作成
ConfigクラスはSpringBootの拡張設定を行う場合に設けるクラスです。
@Configurationアノテーションをクラスにつけます。
package com.example.dbdemo.config;

import javax.sql.DataSource;

import org.springframework.boot.context.properties.ConfigurationProperties;
import org.springframework.boot.jdbc.DataSourceBuilder;
import org.springframework.context.annotation.Bean;
import org.springframework.context.annotation.Configuration;
import org.springframework.context.annotation.Primary;
import org.springframework.context.annotation.PropertySource;

@Configuration
@PropertySource({ "classpath:application.yml" })
public class ApplicationConfig {
    @Bean
    @Primary
    @ConfigurationProperties("spring.datasource")
    public DataSource dataSource() {
        return (org.apache.tomcat.jdbc.pool.DataSource)DataSourceBuilder
                .create().build();
    }
}
SQLファイルの作成
DAOインタフェースを作ったあと、IDEでビルドを行えばDAO実装クラスが自動生成されます。
しかし、検索系メソッドにはコンパイル時に対応するSQLファイルを用意する必要があるため、SQLファイルを作成します。
src/main/resources/META-INF/(FQCN)/(クラス名)/(メソッド名).sqlにメソッドに対応するSQLを記述します。
今回の場合はsrc/main/resources/META-INF/com/example/demo/UserDao/selectAll.sqlです。
※EclipseのDomaプラグインを入れていると、DAOのメソッドからSQLファイルを作成することができます。
http://doma.seasar.org/extension/doma_tools.html
SELECT

id,

name

FROM users

ORDER BY ID ASC
Serviceの作成
Controllerから呼び出し、Repositoryへデータ取得を依頼するサービスクラスを定義しておきます。
package com.example.dbdemo.domain.service;

import java.util.List;

import org.springframework.beans.factory.annotation.Autowired;
import org.springframework.stereotype.Service;
import org.springframework.transaction.annotation.Transactional;

import com.example.dbdemo.domain.model.Users;
import com.example.dbdemo.domain.repository.UsersRepository;

@Service
@Transactional
public class UsersService {
 @Autowired
 UsersRepository usersRepository;

 public List<Users> getUsers() {
 return usersRepository.selectAll();
 }

}
Controllerの作成
検索結果をレスポンスするコントローラークラスを定義しておきます。
サービスusersServiceをDIし、all()メソッドで呼び出しています。
package com.example.dbdemo.controller;
import java.util.List;

import org.springframework.beans.factory.annotation.Autowired;
import org.springframework.web.bind.annotation.RequestMapping;
import org.springframework.web.bind.annotation.RestController;

import com.example.dbdemo.domain.model.Users;
import com.example.dbdemo.domain.service.UsersService;

@RestController
public class HelloController {

    @Autowired
    UsersService usersService;

    @RequestMapping(value = "/selectAll/")
    private List all() {
        return usersService.getUsers();
    }
}
application.ymlにapplication.propertiesをリネームし、以下の記述をします。
※ORACLEの場合
spring:
  datasource:
    url: jdbc:oracle:thin:@xxxxxxxxx:xxxxxxxxx:xx
    username: xxxxxxxxx
    password: xxxxxxxxx
    driverClassName: oracle.jdbc.driver.OracleDriver
doma:
  dialect: oracle
  sql-file-repository: NO_CACHE
SpringBootを起動し、以下URLにアクセスします。
http://localhost:8080/selectAll/